Sunday, November 27, 2011

My First MIDI Studio

By the Fall of 2008 I had been away from the recording scene for quite a while. All of my kids had grown to adults and moved out. It was just me and my wife in the house alone, again, finally. I had developed the need for another musical workspace.

This time I had much less room to work with. We had down-sized our house, now that we were no longer raising kids. So the small downstairs bedroom would have to do. My needs were much simpler this time around. I wanted to put together a MIDI studio. No live instruments, no microphones just sequencers controlling rack-mount synths.  I was going to go back to my roots and reexamine my love of Techno and Electronic music.


I purchased one of those office workstation kits that comes to you in a huge, very heavy box. When you open it up 80 or so pieces, some small, some large land on the floor along with a big bag of hardware. Some assembly required as they say. Man, that thing was a pain-in-the-ass to build. But when it was done I had the foundation for a great electronic music workstation.


The cadenza to the right in the photo had a space that was perfect for a 3 bay 12U rack. That was my first construction project.

After cruising eBay for 3 to 4 months I had all of the basic equipment that I needed to begin the build. The workstation was divided into 3 areas. The rack behind me, the mixer to my left and the desk-top rack, computer and monitors in front of me.

The 3 bay rack housed the synth modules, the patch bay, the MIDI router, an AKAI 4 track digital hard-drive recorder and my Fostex 4mm DAT mastering deck. The AKAI recorder had a MIDI card in it so I could time-lock it with the sequencer. It was great for adding an occasional guitar or vocal track as needed. This rack ended up being a very compact and functional grouping of the equipment employed.


I hung a goofy slanted shelf off of the wall to my right that housed the mixer and the drum machine with my primary MIDI controller below. This placed the equipment right at eye-level and within arms reach. This worked well as I am constantly fiddling with the mixer when I am working.

The mixer was a Behringer MX4264A and the drum machine a Roland DR-550.


There was a 10U desktop rack between the computer and the mixer on the wall to my right. This rack housed the master power switch, most of the effects devices, the synth primary mixers and the monitor power amp.


From top to bottom I remember it being:

  • Alesis power switch
  • ADA 1024 digital delay
  • 2 Alesis nano compressors
  • Alesis micro gate
  • 2 Alesis NanoVerbs
  • Alesis EQ
  • 2 Behringer 1602 8 channel stereo mixers
  • Behringer DEQ2496 monitor EQ
  • Behringer DSP1024
  • Samson power amp
  • Alesis MidiVerb4


The workstation was built around Sonar running on a PC. The old 1989 studio described in the previous post used a DOS version of Cakewalk. This time I tried the new version of Cakewalk,  now known as Sonar. Sonar is a full-blown workstation with lots of features that I didn't use much. I mostly used it like a mulit-track recorder for MIDI.

You can also see my faithful JBL 4401 control monitors. These monitors are over 20 years old and still sound as good as they did the day I bought them. I have mixed a lot of music on those monitors over the years and they have never let me down. The old JBL speakers from the 70's and 80's are about as good as it got back then. The 4300 series monitors from that era are the stuff of legend. JBL took a brute force approach to speaker design back then. They did the best that could be done with the cabinet design, materials and technology that they had at their disposal at the time, but in the end their speaker designs sounded great and could create sound pressure levels that could damage your hearing but required required audio power amps that were capable of arc welding.  I built a pair of JBL 4350 replicas (the big boys with 2 15's in each cabinet) that will be the subject of a future post.

This equipment configuration proved useful for two years. After I had explored most of the capabilities of this setup I decided to expand. The subject of my next post.

Friday, October 21, 2011

My First Studio (1989)

This post will be more of a visual journey... For my second entry I am going to reach back to 1989. During that year my wife was nice enough to agree to allow me to build a full blown recording studio in two of the large downstairs rooms of the house that we were living in at the time.This was a 5000 square foot two-story house. So this  did not take a huge chunk out of the living space.

I had two fellow musician friends that went in with me on the project. One of them contributed a lot of the required building materials the other pooled his recording equipment with mine. At the time he and I were both unrepentant gear sluts (I still am) so this worked out well. In the end we ended up with a well equipped home based 16 track recording studio. Not bad for 1989.

The challenge was to turn two large rooms in a typical house into a full blown semi-professional recording studio. I was working as a computer engineer for Wang Laboratories at the time. I did not have unlimited resources, but i made decent money and had enough to do a real nice job as you will see.

Here I am with my buddy Hollywood. We are scoping out the control room window. It took a real leap of faith to grab a circular saw and cut that hole in a perfectly good wall. We ended up with a nice double pain angled glass control room window.


There was no affordable acoustical treatment in those day (on the budget that we had) so we had to improvise. The dead end of the studio room was finished in old style ceder shakes (roofing). Ceder is a very soft wood and the wedge shape of the shakes, when applied in rows, makes for a great (read: cheap) diffuser. You may also see some of the detail in the CR window in this pic.


If care is taken when applying the ceder shakes it makes a very rustic and pleasing finish and its' acoustical properties have a great cost/benefit ratio.


I'm a EE by training and I have always had an electronics bench wherever I have lived. Such as it was, here is what it looked like at the time. I built a lot of custom equipment and fixtures that were used in the studio construction in this shop.


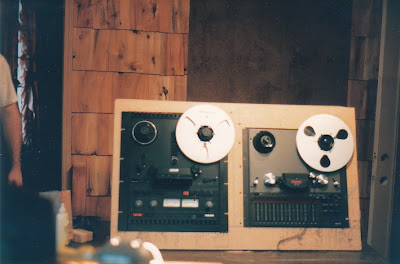
As I said, custom fixtures. Here is the rack that was built for the recorders. All of the studio furniture was Formica on MDF construction. Very professional looking but a huge pain-in-the-ass to make. The recorders were an Otari 5050 1/4 in half-track mastering machine and a Fostex B-16 one-inch 16 track machine. They sounded great and performed flawless.


Here is a close up shot taken across the console looking at one of the effects bays. It was a Tascam 24 X 8 X 2 console. Considered upper end semi-pro at the time. It was a sweet board. Note the RCA patch bay. They don't make 'em like that any more, thank God.

Some of the equipment in that rack I still recognize.  That's a Yamaha SPX 90 near the top. An old MXR dual 15 band EQ below it. A pair of DBX old school limiters. A Delta digital delay. And a Lexicon LX series digital reverb. That is probably that most expensive piece of equipment in the room. It was considered a top-of-the-line digital reverb in its' day. I can still remember the sweet sound of that reverb.
And in the left bay is my old Apple IIc  computer running my first (very crude) attempt at digital DSP. It sounded like crap but I learned a lot writing that program. The D/A and A/D converters are in that small grey box to the right of the green-screen monitor.


Just off camera in the above pic was an old IBM PC running the DOS based version Cakewalk. Cakewalk was one of the first commercially available software sequencers. There was a companion ISA card that was installed in the PC that handled the MIDI I/O and there were also analog SMPTE in and out ports on the card as well. This allowed you print a SMPTE stripe on the multi-track machine (usually on an edge track - track 1 or 16). You could then put Cakewalk in sync mode and it would chase-lock with the Fostex multi-track tape machine. When you hit the PLAY button on the Fostex, Cakewalk would stay in perfect time-sync with the tape machine as it rolled. This allowed you add MIDI based interments to the mix without burning any additional tracks on the multi-track machine. For the money invested, that was quite a technical trick in 1989. I can still recall that look of amazement on the faces of my musician friends when I demoed this capability for the first time that they had ever seen it. And from what I recall, I remember that old DOS version of Cakewalk was a joy and a pleasure to use. Software was so much simpler back in those days. (Now I'm starting to show my age and just grousing I guess...)


I'll leave you with this closing shot of my friend Keith. Keith was a friend that I worked with at the time. He was not a musician and had never been in a recording studio. I do not recall what project was in progress when this picture was taken, but I do remember bringing Keith in and setting him down in front of the console and showing him how it worked and then said: "have fun!". That look on his face says it all. Keith was about as non-technical as a person could be, yet a few simple instructions and some rockin' tunes on the multi-track machine seems to be the recipe for big fun, proving that music truly is a universal language. We are all drawn to it to some degree. I have never met anyone who didn't like some kind of music.


Next time I'll share some of my more resent studio efforts with you. My MIDI studios...


Tuesday, October 18, 2011

And So It Begins...

Taking the first step is always the hardest, as they say. This will be my first attempt at blogging. I intend for this to be a journal of my activities in my home midi studio.

I'm an Electrical Engineer by training and practiced for the first 10 years of my career after college. Early in my engineering career I became involved in a project that required programming a microprocessor. This was back in the early 80's when assembly language programming was very much a "black art". Through a fortuitous twist of fate, the task of figuring out how to program the microprocessor fell to me. This sent me on a trek for the next ten years of learning successively more complicated processors and programming them. This, in turn,  led me to the IT profession where I work today as the Director of Technology for a mid-sized company in Tennessee.

I have always been attracted to music that was well engineered technically. Recording engineers like Alan Parsons, Roger Nichols and Bob Clearmountain have well earned reputations for producing some of the most sonically precise music in the business. Albums like Steely Dan's Gaucho, Alan Parsons Ammonia Avenue and Roxy Music's Avalon stand as monuments to these monsters of recording engineering. I have always enjoyed understanding the technology that is employed to record and mix that music. This is partially what drove me to embrace and understand Midi and ended up sending me off on a course of exploring electronic music more deeply.

My musical interests  have always leaned toward Techno - even before it was called Techno. I remember back in the 1970's being attracted to artists like [then knows as] Walter Carlos, Isao Tomita, Mike Oldfield and Keith Emerson. As the Techno landscape began to stratify into it's many genres in the 80's and 90's I was attracted to primarily two of them: Ambient and Trance. Some of my favorite techno artists are Hybrid, The Crystal Method, Deadmou5, Daft Punk, Paul van Dyk, Armin van Buuren and John Digweed

I have always had some sort of musical composition space in my home. At times it has been more modest that it is now, but its always been there. About 2 years ago I began the conversion of one of the rooms in my house into a dedicated studio space. This has evolved over time into a very well equipped home midi studio.

My next few posts will detail the construction and features of my studio. Stay tuned...